We McDonalds have been making (chicken) bone broth since way before bone broth was cool. We called it “chicken pickin’.” And chicken pickin’ sort of evolved into bone broth.
You see, in the McDonald household, “Chicken Pickin’” was a highly valued family tradition. Basically, it was the time when children (especially those who looked like they needed a “job”) were chosen to gather around the table (little children too) to “pick” chicken meat off the bones after making rich, homemade chicken stock.
When it was all finished, we bagged up the shredded chicken, put the rich, golden broth into mason jars, and stored it all in the freezer for cooking over the next few weeks or months.
While some people these days think chicken broth comes in a can, once you taste the homemade stuff, you’re ruined for life! You can’t find anything close to this on a grocery store shelf! Plus most commercial broths are nutritionally lacking, loaded with MSG and sodium, and none are as rich and tasty as homemade!
The Bone Broth Miracle
 However, now that we know more about the amazing benefits of “bone broth,” we’ve become more deliberate in our preparation. After removing the shredded chicken, back into the slow cooker go the bones, livers, hearts, and even the feet – for another few days!
The result is a rich, nutrient-dense broth loaded with collagen, elastin, protein, vitamins, minerals, and more! This is all good for your gut, your joints, your brain, your hair, your nails, your skin, and who knows what else!
Homemade Chicken Bone Broth
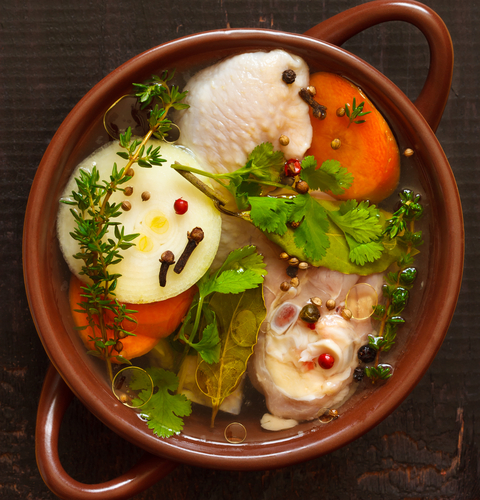
Can also be made in the Instant Pot!Start with two whole 4-5 lb. hens, cut up with the bones exposed. Or, you can use chicken backs, wings, legs, thighs, necks, feet, or gizzards. You can ask your butcher for a good price on cheaper cuts and he may even chop it all up for you (or ask him if he will sell you just the bones and innards!). Cutting up the bones helps the marrow to escape into your broth.
- 4-6 quarts of water
- 2 free-range hens or “just the bones”
- chicken feet, necks, backs, gizzards, hearts, livers etc.
- A head of garlic, coarsely chopped
- Half a bundle of celery (the side with leaves), coarsely chopped
- 1-2 whole white onions, coarsely chopped
- fresh parsley, thyme, and bay leaves (optional)
- Sea salt
- 1 tsp. black pepper corns
- 2 T. Raw apple cider vinegar
Place everything except the vinegar in a large stock pot and bring to medium-high heat. Once heated, skim off any scum floating on top, cover the pot, and turn down the fire. Simmer on medium-low for about 2 hours, or until done. Remove chicken and let cool slightly in a large casserole dish or jelly roll pan.
If you would prefer, you can roast your chicken first (this will make the flavor of your broth better too). The goal is to get the cooked meat off the bones, so you can get to the business of making bone broth! If making bone broth using bones and chicken parts only, you could skip this part, but a quick roast at 400 degrees would still add flavor.
 Allow broth to continue to simmer on low while you pick the chicken off the bones. Gather any stray children who look like they need something to do and put them tto work together at a table to “pick chicken” off the bones. This chore is called “chicken pickin’. Once the chicken is picked, divide it into one quart freezer bags for later use in soups, chicken salad, casseroles, and other recipes.
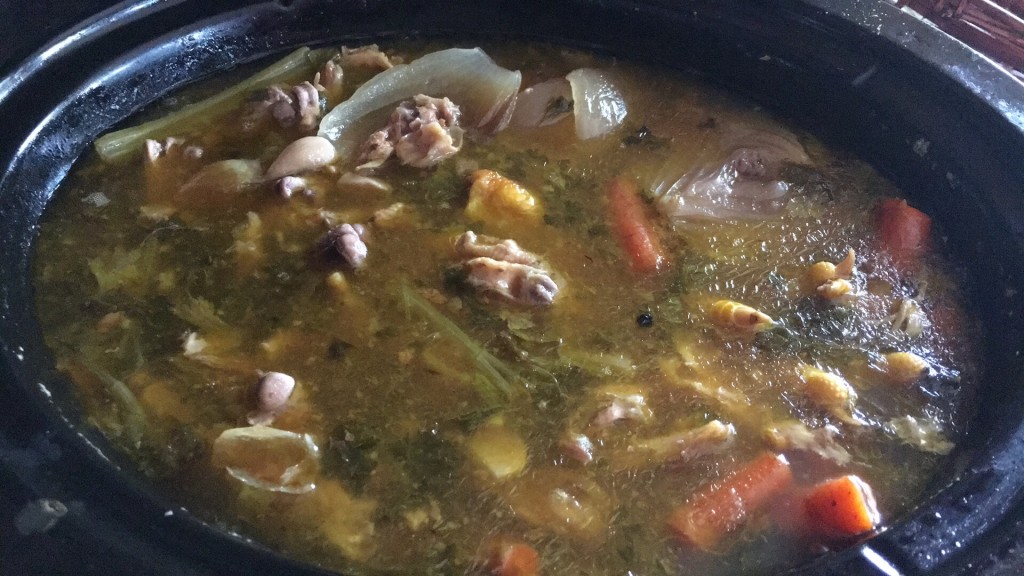
Simmer the broth down to a manageable amount; then, take all the bones, innards, veggies, and scraps and put them back into the broth in a crock pot for a 12-24 hour simmer. Don’t forget to add your raw apple cider vinegar to the broth after removing the chicken meat; it helps to leech the minerals from the bones and into your broth!
Note: If at all possible, add a few washed chicken feet. Yeah, I know it sounds gross, but you won’t be sorry! Chicken feet are loaded with gelatin and make a far superior broth!
After about 18 hours, you should be able to break apart the bones easily with a metal spoon. This helps the marrow to escape into your broth.
When your broth is a nice, rich, thick, delicious consistency, strain through a fine mesh strainer, dispose of bones and vegetables, pour broth into mason jars, cool in a water bath in the sink, and refrigerate. Once the broth is chilled, you can easily remove the hardened fat layer from the top.* Use or freeze as desired.
Your nutritious broth can be used in soups, stews, gravies, sauces, or simply sipped straight from a mug! You can also “up” the nutrition of spaghetti sauces, casseroles, or veggies by adding some of your precious broth to the mix!
And chicken broth is not only delicious in your favorite recipe, it’s fantastic for anyone recuperating from an illness. It’s warm, easy to digest, delicious, and filled with dense nutrition and a ton of immune boosting garlic, herbs, and spices.
This stock enhances your immune system and provides you with easy to assimilate minerals. The marrow inside the bones contains nutrients that feed your bone marrow. And when your bone marrow is nourished, you create healthier immune cells and can better fight off colds and other viruses!
You’ll notice I keep this “bare bones” recipe pretty plain. That’s because once I defrost a jar for a recipe, I can choose the flavor then: Thai, Italian, Cajun, Mexican, etc. I can add various veggies, spices, herbs, and other additions as I please.
I’ll be posting some of my favorite “Bone Broth Concoctions” soon! So keep a look out!
Note for Mamas:
If you have just had a baby, supplement your meals by drinking two cups of this rich broth each day for several months. If you are recovering from an illness, surgery, trauma, or fatigue, good, rich, marrow-filled broth is an excellent meal choice while you recuperate.
And the more fresh garlic the better!
Other Bone Broth Options
Use this same method for making beef, pork, lamb, or seafood broth. Beef, pork, and lamb bone broth should be simmered for a lot longer (48-72 hours), as it takes longer for their bones to break down. It will still taste amazing and be super good for you even after 12-24 hours, but longer is even better!
For seafood broth, use (non-oily) fish heads and bones, or shrimp shells. And only simmer for a few hours, as fish bones dissolve quickly.